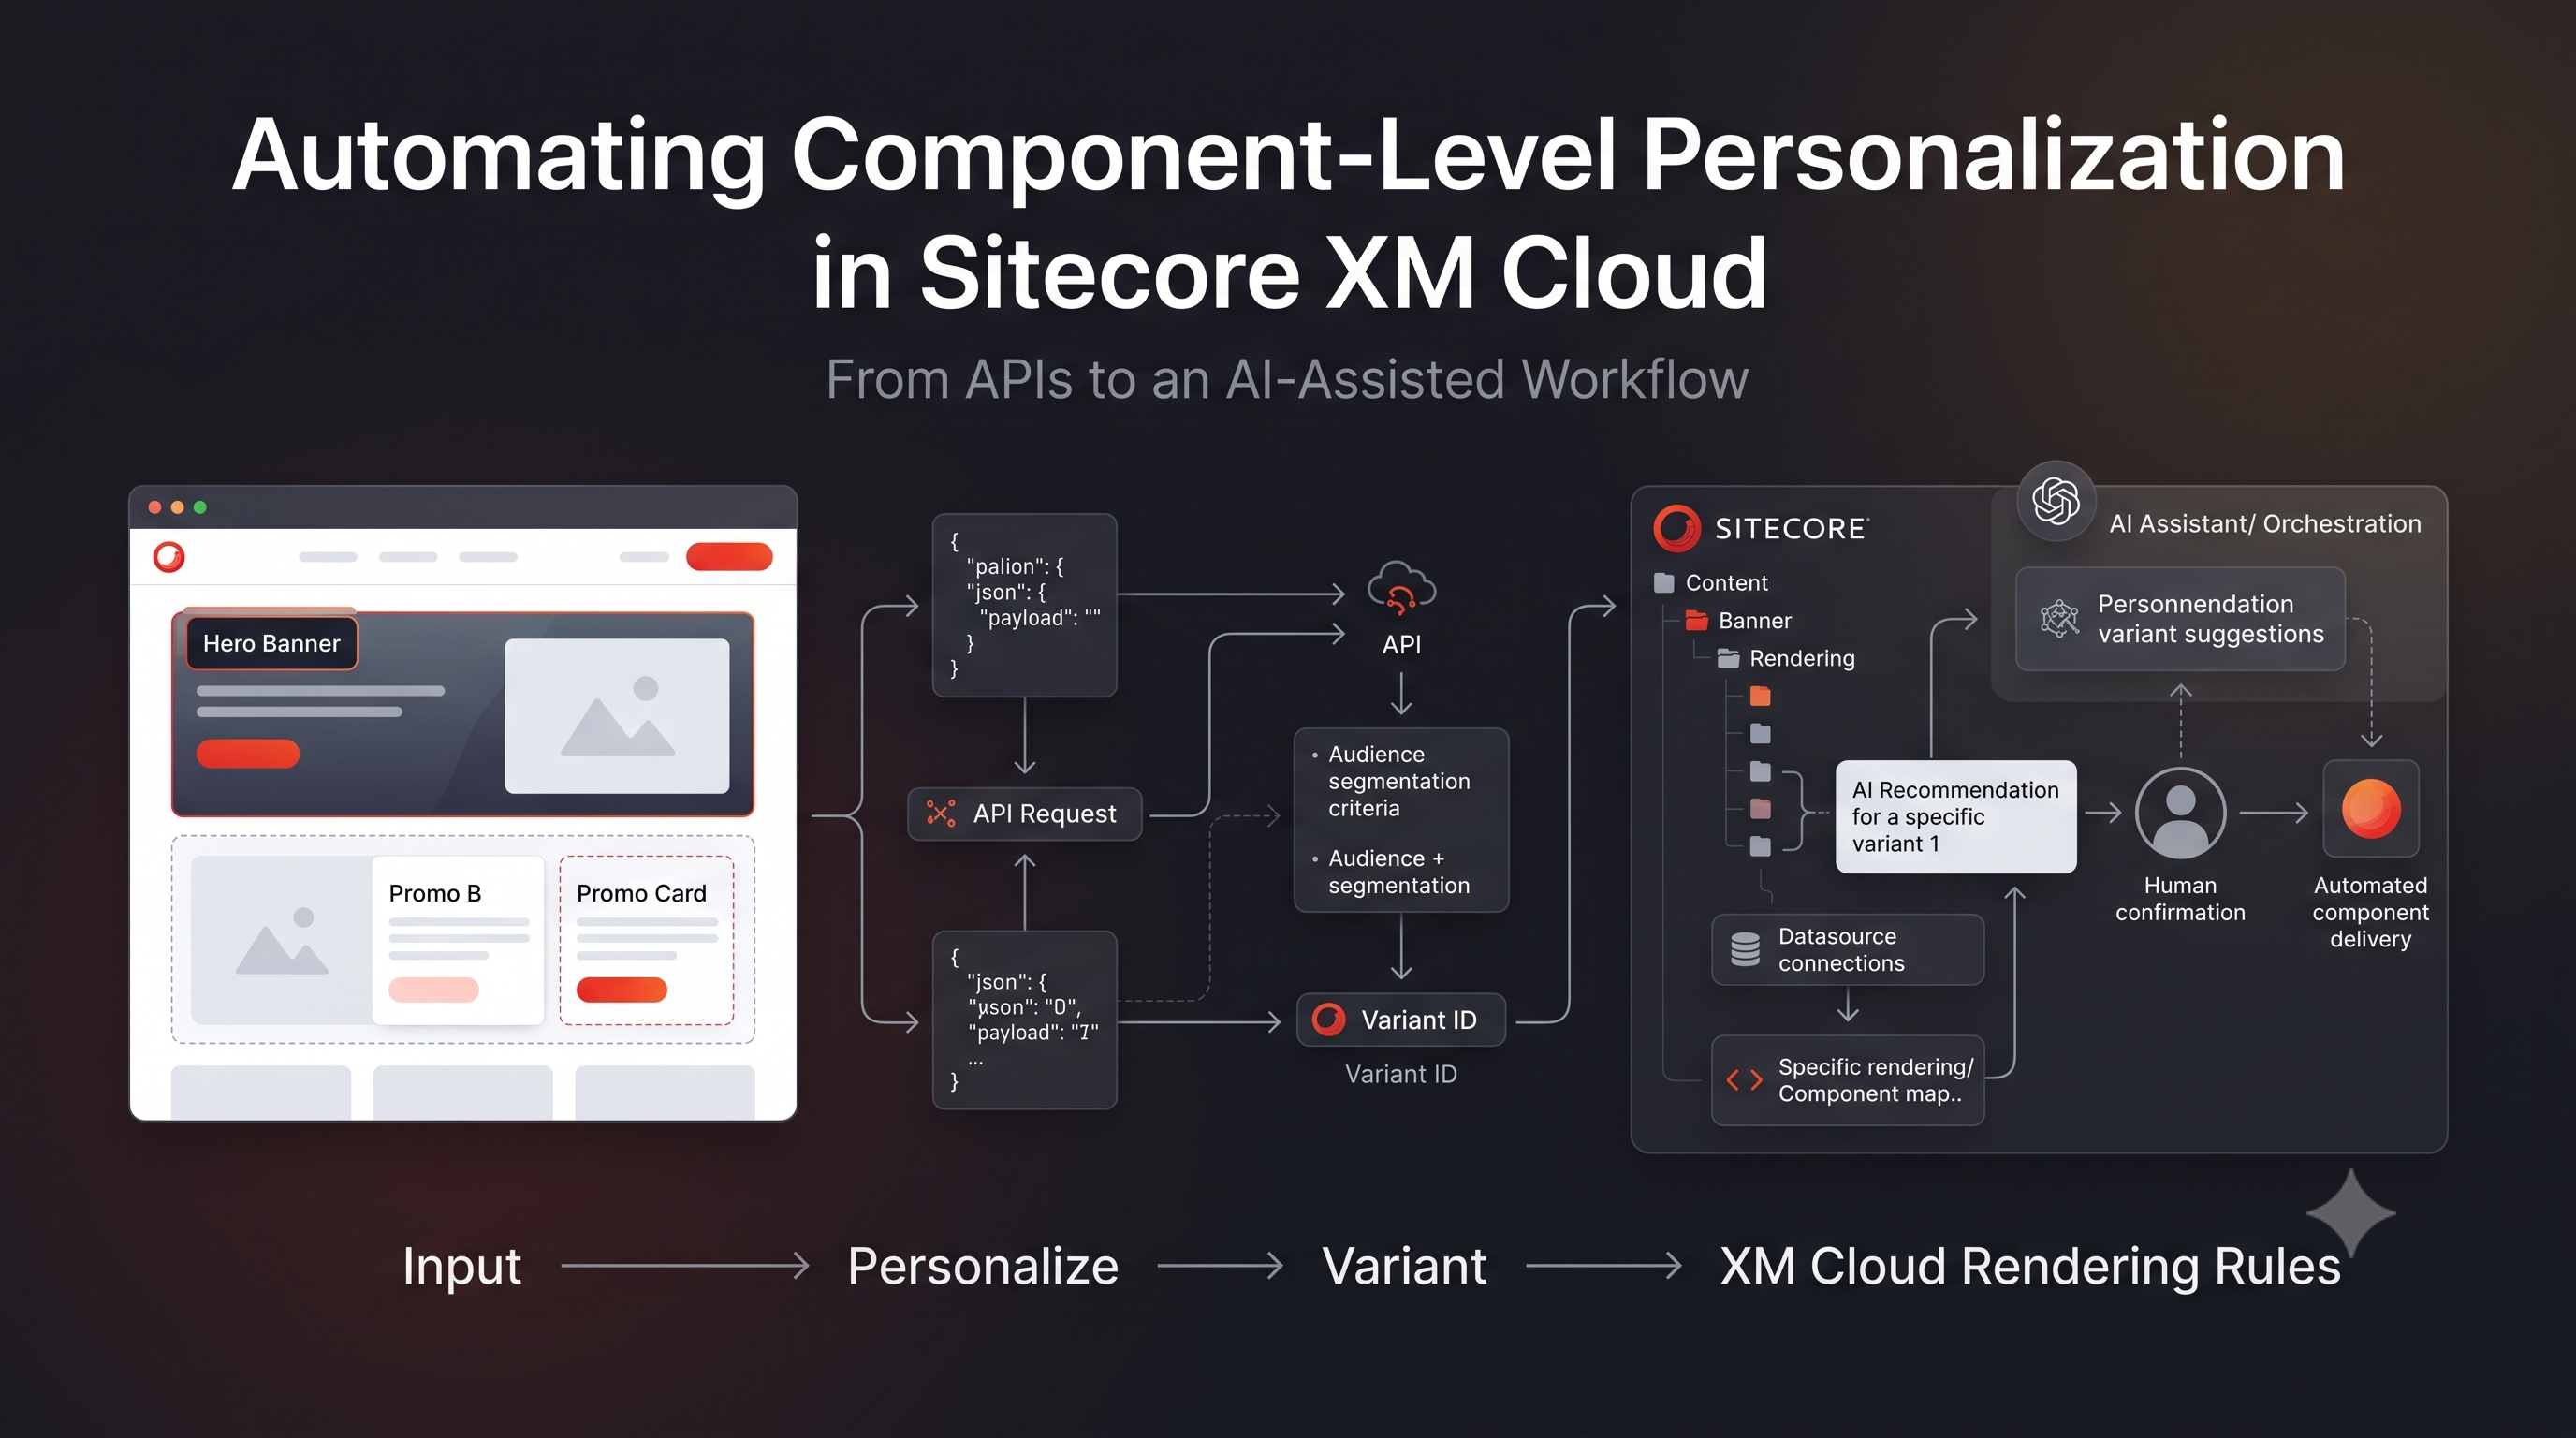
Automating Component-Level Personalization in Sitecore XM Cloud: From APIs to an AI-Assisted Workflow
Overview
Creating component-level personalization in Sitecore XM Cloud is usually a multi-system, multi-click process: pick a page, invent an audience, create variant content items, configure a Sitecore Personalize experience, then attach personalization rules to specific renderings in layout XML. That work is accurate when done carefully — and slow when repeated often.
This article shows how to automate that authoring chain by programmatically:
- Creating Sitecore datasource items for personalized content
- Creating or updating a Sitecore Personalize flow definition with audience-based traffic splits
- Injecting personalization rules into the page’s
__Final Renderingsfield
This is an authoring / automation guide (not runtime visitor decisioning). At runtime, Sitecore Personalize resolves the matching audience split and returns the variantId; the XM Cloud layout then applies the rule whose s:VariantName matches. Publishing items and promoting flows to PRODUCTION are out of scope unless you add them. AI can optionally propose the same structured input — see Where AI fits — but the steps below are the deterministic apply layer: recommend → confirm → automate.
The scenario: Google traffic on a product page
Suppose a product page has a Hero and a Promo component.
Goal: Visitors arriving from Google (utm_source = google) should see a Google-specific Hero, while the Promo should be hidden for that audience. Everyone else keeps the default layout.
Normally an author would:
- Create a Google Hero datasource
- Configure a Personalize experience with that audience
- Add personalization rules on each rendering instance
Automation does those steps for the Google MacBook example (variantName = fromGoogleMacbook).
Before and after
BEFORE
  Hero  → local:/Data/MacBook_Pro_Hero (no rules)
  Promo → visible (no rules)
  Personalize → no experience for this page/language

AFTER
  Hero  → Default: MacBook_Pro_Hero
         → Google (fromGoogleMacbook): local:/Data/MacBook Pro from Google
  Promo → Google (fromGoogleMacbook): Hide Rendering
  Personalize → INTERACTIVE experience (DRAFT)
              → split fromGoogleMacbook + UTM source = google
              → template embeds variantId
  __Final Renderings → rules on Hero/Promo match that variantId
How the automation works
Read this section once before the steps — it is the mental model the rest of the article builds on.
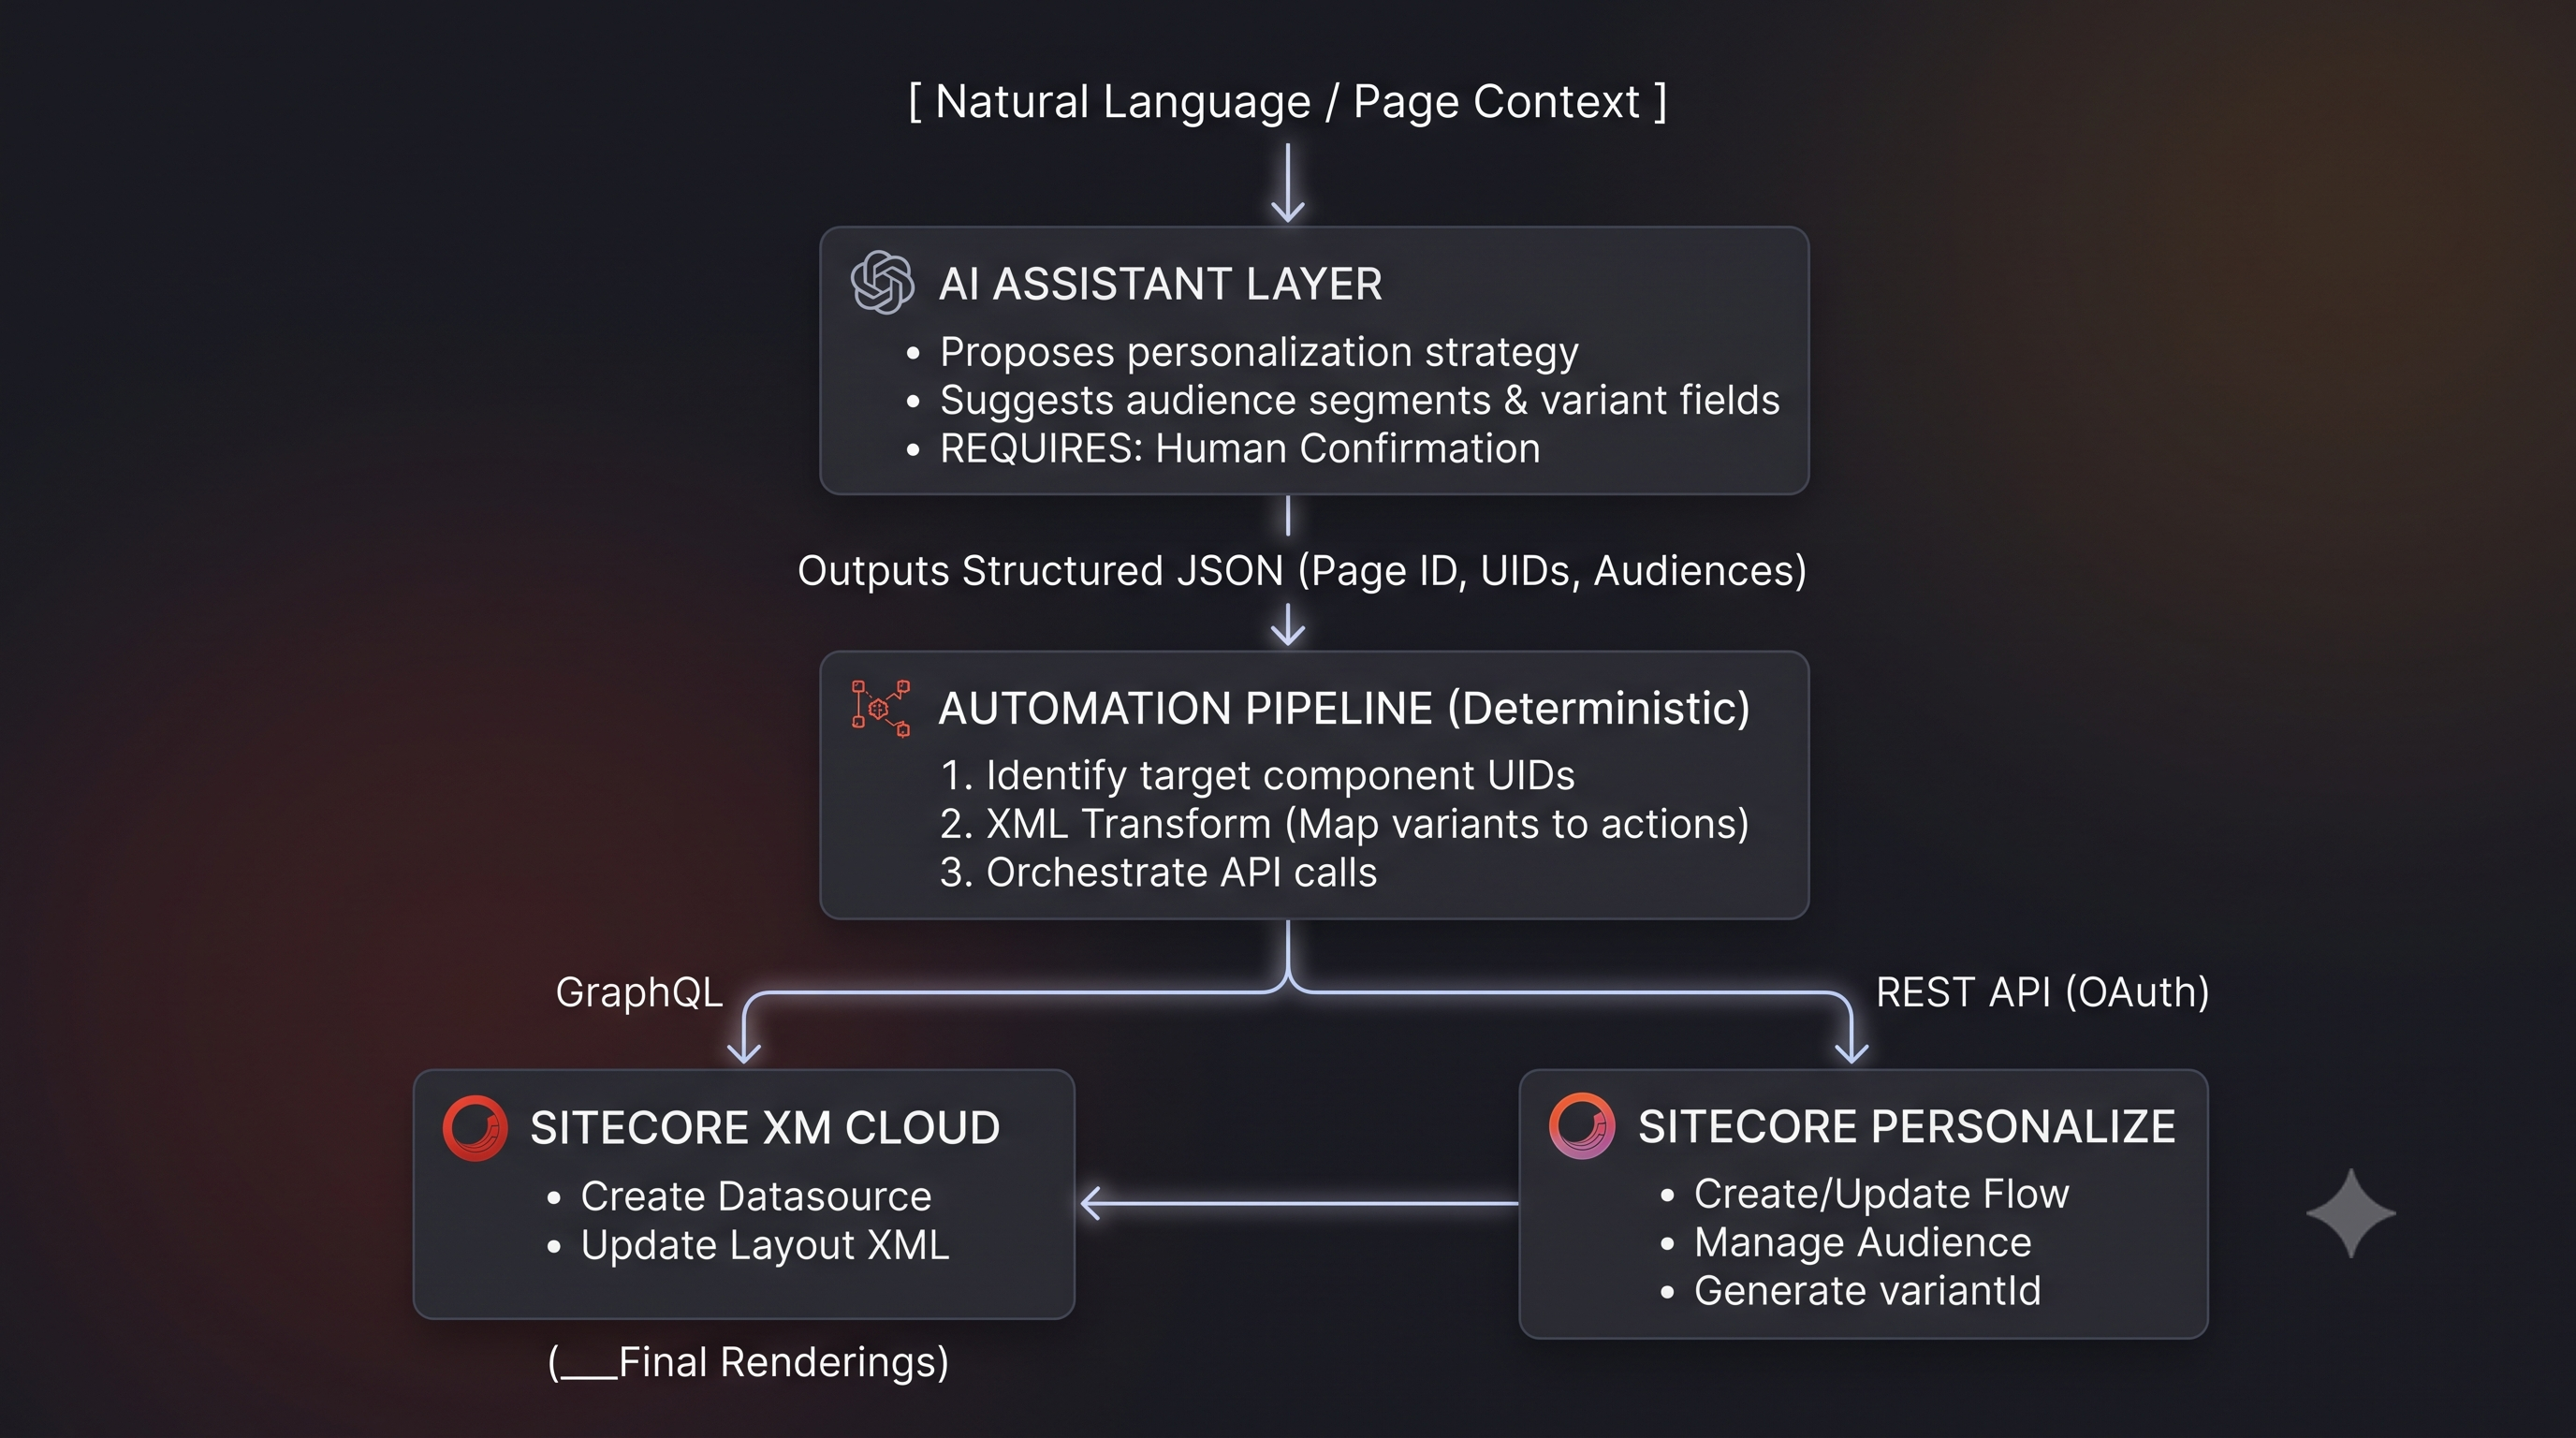
Figure: End-to-end flow — AI proposes (with human confirmation), automation applies, XM Cloud and Personalize stay in sync through variantId.
a) What you stop doing by hand
| Manual authoring | Automation |
|---|---|
| Select page | Page id / path / language / version / siteId in input |
| Select Hero / Promo rendering instance | Resolve rendering instance UID |
| Create variant datasource | Authoring GraphQL createItem + updateItem |
| Configure audience | Build conditionGroups in input |
| Create Personalize experience | POST / PUT Flow Definition API |
| Add personalization rule on component | Transform and write __Final Renderings |
| Repeat for another variant | Iterate page.variants[] |
| Review result | Automated validation + logs |
b) The variantId bridge
One identifier links Personalize and Sitecore:
- Audience — UTM source =
google(conditionGroups) - Personalize flow —
audienceTrafficsplit namedfromGoogleMacbook variantId— a GUID your automation creates (or reuses from an existing split on GET) and stores intemplate: {"variantId":"..."}- Sitecore rule —
s:VariantName/s:nameequals that samevariantId - Action — Set Data Source (Hero) or Hide Rendering (Promo)
Who owns variantId? Personalize does not invent this value for you in this pattern. You generate a GUID when creating a new split, embed it in the split template, and write the same value into Sitecore rules. On re-run, if a split with the same variantName already exists, reuse its variantId so layout rules stay aligned.
Audience logic stays in Personalize. Sitecore does not re-implement UTM conditions on every rule — it matches the resolved variantId.
Example values:
variantName = fromGoogleMacbook
variantId   = a1b2c3d4-e5f6-7890-abcd-ef1234567890   ← generated (or reused) by automation
c) Terms you’ll see in the steps
-
Audience — The visitors we want to target. In this example, it means visitors who came from Google, based on the UTM source.
-
Flow / Experience — The personalization experience we create in Sitecore Personalize. It contains the experience name, status, and the different versions we want to show.
-
Variant — A version of the experience shown to a particular audience.
Example:fromGoogleMacbookmeans show the MacBook version to visitors coming from Google. -
Traffic split — Defines who sees which variant. For example:
- Google visitors →
fromGoogleMacbook - Everyone else → default experience
- Google visitors →
-
Rendering — The Sitecore component itself, such as a Hero, Promo, or Product Card.
-
Rendering instance — A specific occurrence of that component on a page. For example, a page might contain two Promo components. Personalization is applied to the specific instance you want to change.
-
Datasource — The Sitecore content item used by the rendering.
Example: the rendering could normally use a “MacBook Pro” content item, while the personalized version uses a different MacBook content item. -
__Final Renderings— The Sitecore field that contains the page's final layout XML, including personalization settings. When we need to update the personalization configuration programmatically, we update this field through Sitecore's authoring API/GraphQL. -
Experience Edge — Used for delivering published Sitecore content to the edge. It is not the place where we write the page's
__Final Renderingspersonalization configuration. -
INTERACTIVE_API_FLOW— Personalize flow type used for API-driven / embedded (Pages-style) experiences. This is different from classic Personalize web experiences you configure only in the Personalize UI; XM Cloud component personalization typically uses the interactive API flow shape. -
clientKey— Your Personalize / CDP tenant key sent on the flow payload. It is not the OAuthclient_id/client_secretpair used to get a Bearer token. -
conditionGroups— Personalize audience structure: each group is a set of conditions (AND within a group). Multiple groups are typically OR’d. Nested shape matches what the Flow Definition API expects on each split. -
Authoring GraphQL token vs Marketplace token — Raw HTTP calls use an XM Cloud Authoring API access token. Marketplace apps obtain an authoring-capable token via the Marketplace SDK / extension context. Same GraphQL operations; different how you authenticate.
d) End-to-end pipeline
- Input — structured payload (page + variants + conditionGroups + component actions)
- Identify target — page context + component instance UIDs from layout
- Prepare content —
createItem/updateItemfor Set Data Source actions - Configure Personalize — OAuth → create/update
INTERACTIVE_API_FLOW→ embed automation-ownedvariantIdper split - Apply to layout — inject rules under matching
<r uid="...">elements - Validate — datasources + flow + rules (+ logs)
| Concern | System |
|---|---|
| Who qualifies for a variant | Sitecore Personalize (conditionGroups on splits) |
| What content exists for a variant | XM Cloud items (datasources) |
| What the page does when a variant matches | XM Cloud __Final Renderings rules |
Before you start
Prerequisites
| Already exists (required) | Created / changed by automation | Out of scope |
|---|---|---|
| Sitecore page (path, language, version) | Variant datasource items | Creating component / datasource templates |
| Hero and Promo rendering instances on the page | Personalize flow / traffic splits | Runtime visitor identification / decisioning |
Datasource template(s) + page Data folder | __Final Renderings rules on targeted instances | Publishing items or promoting flows to PRODUCTION (unless you add it) |
| Personalize environment + API access | Custom personalization action implementation | |
| OOTB Set Data Source / Hide Rendering / variant-match definitions | Unrelated CDP, analytics, or commerce | |
| Personalize OAuth + XM Cloud Authoring GraphQL credentials (or Marketplace token) |
APIs you’ll use
Use these in order. Request bodies and mutation examples appear in the steps that first need them.
1. Sitecore Personalize — OAuth
Role: Obtain a Bearer token for Flow Definition API calls.
- Method / URL:
POST https://auth.sitecorecloud.io/oauth/token - Auth: Client credentials (
client_id,client_secret,grant_type=client_credentials,audience=https://api.sitecorecloud.io) - Docs:
2. Sitecore Personalize — Flow Definition API
Role: Create or update the experience that owns audience splits. Your automation supplies each split’s variantId in template.
- Base URL: Environment-dependent (
v2/v3/ regional) — use the host shown for your tenant - Operations:
GET …/flowDefinitions/{friendlyId}POST …/flowDefinitionsPUT …/flowDefinitions/{ref}
- Docs:
3. XM Cloud — Authoring and Management GraphQL
Role: Create variant datasources and read/write __Final Renderings.
- Operations:
item— resolve templates, Data folder, current layout XMLcreateItem— create variant datasources under{page}/DataupdateItem— fill datasource fields; persist__Final Renderings
- Docs:
Configuration you’ll need
| Config | What it is |
|---|---|
Personalize OAuth client_id / client_secret | Credentials to obtain a Bearer token for Flow Definition API |
Personalize / CDP clientKey | Tenant key on the flow JSON body (separate from OAuth) |
| Flow API base URL | Environment-specific host from Personalize docs |
| XM Cloud Authoring token or Marketplace access token | Auth for Authoring GraphQL (createItem / updateItem / item) |
| Authoring database | Often master |
siteId | XM Cloud site definition id for the site that owns the page — stored on the Personalize flow (same site context Pages would use) |
Never commit real secrets — use environment variables and placeholders in docs.
Step 1 — Input / preparation
Goal: Describe the Google MacBook scenario as a validated, machine-readable contract (where / who / what).
Automation needs:
- Where — page id, path, language, version, siteId
- Who — audience (
conditionGroups) - What — component instances and actions (Set Data Source / Hide Rendering)
Full input schema
Custom orchestration contract — not a Sitecore API.
The JSON below is our automation input schema. It is not an Authoring GraphQL request body and not a Personalize Flow Definition payload. Steps 3–6 map fields from this contract into the official APIs.
{
  "page": {
    "id": "{52C6E3B3-0DA8-4071-BF34-9317B47875E6}",
    "path": "/sitecore/content/Welcome to XMC/Your first site/Home/products/laptop/macbook-pro",
    "language": "en",
    "version": 1,
    "siteId": "{D9EAC5B1-98CF-4C6E-8A8F-111C431B1E33}",
    "variants": [
      {
        "name": "fromGoogleMacbook",
        "conditionGroups": [
          {
            "conditions": [
              {
                "templateId": "utm_value",
                "params": {
                  "type": "source",
                  "compares to": "is equal to",
                  "UTM value": "google"
                }
              }
            ]
          }
        ],
        "components": [
          {
            "UID": "{B1F293A7-7FC8-4D4E-BD2D-5537A5C443E0}",
            "id": "{6D0AAE4A-C2D1-4F3A-8285-705D13DE8244}",
            "name": "Hero",
            "action": {
              "name": "Set Data Source",
              "id": "{0F3C6BEC-E56B-4875-93D7-2846A75881D2}",
              "inputs": {
                "dataSource": "local:/Data/MacBook Pro from Google",
                "parameters": {},
                "datasourceFields": {
                  "Title": "MacBook Pro from Google",
                  "Description": "Special offer for Google visitors"
                }
              }
            }
          },
          {
            "UID": "{BED9EF34-72C4-438F-B515-13919BFA8418}",
            "id": "{945776A1-8F30-4749-A668-4FCC434A60ED}",
            "name": "Promo",
            "action": {
              "name": "Hide Rendering",
              "id": "{25F351A1-712D-45F8-857D-8AD95BB2ACE9}",
              "inputs": {}
            }
          }
        ]
      }
    ]
  }
}
Important fields:
| Field | Why it exists |
|---|---|
page.id / path / language / version | Target item for GraphQL read/write |
page.siteId | XM Cloud site id copied onto the Personalize flow payload |
variants[].name | Human-readable split name (variantName) |
variants[].conditionGroups | Audience rules for Personalize splits (AND within a group; groups OR’d) |
components[].UID | Rendering instance uid in layout XML |
components[].id | Rendering definition item id (must match layout s:id; used for Datasource Template lookup) |
action.name / action.id | Personalization action encoded in XML (OOTB item ids) |
inputs.dataSource / datasourceFields | Path + field values for Set Data Source |
Checks: required page fields present; each variant has name, conditionGroups, and components; prefer OOTB actions only for fully automated apply.
What you should see next: A validated payload where Hero/Promo UID and id values match the live page layout (Step 2), ready to feed datasource creation and flow configuration.
Step 2 — Identify the target component
Goal: Confirm Hero/Promo instance UIDs against live layout so rules attach to the right <r> elements.
Chain: Page → rendering definition → rendering instance (UID) → datasource → variant → action → __Final Renderings
Example layout before personalization:
<r xmlns:p="p" xmlns:s="s" p:p="1">
  <d id="{FE5D7FDF-89C0-4D99-9AA3-B5FBD009C9F3}">
    <r uid="{B1F293A7-7FC8-4D4E-BD2D-5537A5C443E0}"
       p:before="*"
       s:ds="local:/Data/MacBook_Pro_Hero"
       s:id="{6D0AAE4A-C2D1-4F3A-8285-705D13DE8244}"
       s:par=""
       s:ph="headless-main" />
    <r uid="{BED9EF34-72C4-438F-B515-13919BFA8418}"
       p:after="*[1=2]"
       s:ds="local:/Data/mackbook-pro-promo1"
       s:id="{945776A1-8F30-4749-A668-4FCC434A60ED}"
       s:par="..."
       s:ph="headless-main" />
  </d>
</r>
uidon<r>= instance to personalize (must matchcomponents[].UID)s:id= rendering definitions:ds= current default datasource
Resolve UIDs from live layout (Pages context, preview layout query, or an exported snapshot) — do not guess them.
What you should see next: Confirmed Hero uid {B1F293A7-…} and Promo uid {BED9EF34-…} with matching s:id values in your input payload.
Step 3 — Create variant content (datasources)
Goal: For each Set Data Source action, create the content item under {page.path}/Data and fill datasourceFields.
Authoring GraphQL sequence:
- Read the rendering item’s
Datasource Templateusingcomponent.id - Resolve that template path to a
templateId - Resolve parent folder
{page.path}/DatatoparentId createItemwith name derived frominputs.dataSourceupdateItemwithdatasourceFields(whitelist against template fields)
1–3. Resolve template and Data folder
query ResolveDatasourceContext {
  rendering: item(
    where: {
      database: "master",
      itemId: "{6D0AAE4A-C2D1-4F3A-8285-705D13DE8244}"
    }
  ) {
    name
    datasourceTemplate: field(name: "Datasource Template") {
      value
    }
  }
  dataFolder: item(
    where: {
      database: "master",
      path: "/sitecore/content/Welcome to XMC/Your first site/Home/products/laptop/macbook-pro/Data"
    }
  ) {
    itemId
    path
  }
}
If Datasource Template returns a path (for example /sitecore/templates/.../Hero), resolve that path to an item id for createItem.templateId. If it already returns a GUID, use it directly.
4. Create the datasource item
mutation CreateItem($input: CreateItemInput!) {
  createItem(input: $input) {
    item {
      itemId
      path
      name
    }
  }
}
{
  "input": {
    "name": "MacBook Pro from Google",
    "templateId": "<TEMPLATE_ITEM_ID>",
    "parent": "<DATA_FOLDER_ITEM_ID>",
    "language": "en"
  }
}
5. Fill fields with updateItem
mutation UpdateDatasourceFields {
  updateItem(input: {
    database: "master",
    itemId: "<NEW_DATASOURCE_ITEM_ID>",
    language: "en",
    version: 1,
    fields: [
      { name: "Title", value: "MacBook Pro from Google", reset: false },
      { name: "Description", value: "Special offer for Google visitors", reset: false }
    ]
  }) {
    item {
      itemId
      name
      path
    }
  }
}
Skip datasource creation when the template or Data folder is missing. Hide Rendering (Promo) needs no content item.
What you should see next: Under {page}/Data, an item named MacBook Pro from Google with the expected Title/Description — still unpublished if you have not added a publish step.
Step 4 — Configure personalization (Personalize flow)
Goal: Create or update an INTERACTIVE_API_FLOW with audienceTraffic splits so each variant gets a variantId Sitecore can match. (Flow definition REST API)
INTERACTIVE_API_FLOW is the Personalize type for API / embedded experiences (what XM Cloud Pages-style component personalization uses). It is not the same as a classic Personalize “web experience” built only in the Personalize UI.
Auth (OAuth)
Use OAuth client_id / client_secret here. The flow body’s clientKey is separate (tenant key).
POST https://auth.sitecorecloud.io/oauth/token
Content-Type: application/x-www-form-urlencoded

client_id=<CLIENT_ID>
client_secret=<CLIENT_SECRET>
grant_type=client_credentials
audience=https://api.sitecorecloud.io
Flow naming
Keep one flow per page + language. The naming below is an automation convention (similar to Pages-style embedded experiences) — not a Flow API requirement. Use any stable scheme as long as GET …/flowDefinitions/{friendlyId} is deterministic for create-vs-update:
name:{pageName} {language} - {itemId}friendlyId:embedded_{itemIdWithoutDashes}_{language}
Who generates variantId?
Before POST/PUT:
- If GET returns an existing split with the same
variantName, reuse itstemplate.variantId. - Otherwise generate a new GUID in your automation and set
splits[].templateto the JSON string{"variantId":"<guid>"}. - Pass that same GUID into the Sitecore rule transform (Step 5).
Create payload (essentials)
When GET returns 404, POST a payload shaped like:
{
  "name": "macbook-pro en - 52c6e3b30da84071bf349317b47875e6",
  "friendlyId": "embedded_52c6e3b30da84071bf349317b47875e6_en",
  "clientKey": "<CLIENT_KEY>",
  "type": "INTERACTIVE_API_FLOW",
  "subtype": "EXPERIENCE",
  "channels": ["WEB"],
  "businessProcess": "interactive_v1",
  "siteId": "{D9EAC5B1-98CF-4C6E-8A8F-111C431B1E33}",
  "traffic": {
    "type": "audienceTraffic",
    "weightingAlgorithm": "USER_DEFINED",
    "splits": [
      {
        "template": "{\"variantId\":\"a1b2c3d4-e5f6-7890-abcd-ef1234567890\"}",
        "variantName": "fromGoogleMacbook",
        "conditionGroups": [
          {
            "conditions": [
              {
                "templateId": "utm_value",
                "params": {
                  "type": "source",
                  "compares to": "is equal to",
                  "UTM value": "google"
                }
              }
            ]
          }
        ]
      }
    ]
  },
  "variants": [],
  "status": "DRAFT",
  "schedule": {
    "type": "simpleSchedule",
    "startDate": "2026-09-30T00:00:00.000Z"
  }
}
| Field | Role |
|---|---|
type / subtype | Interactive API experience (INTERACTIVE_API_FLOW + EXPERIENCE) |
traffic.type: audienceTraffic | Audience-driven splits (official Personalize traffic type) |
splits[].template | JSON string embedding the variantId your automation owns |
splits[].conditionGroups | Audience conditions from your custom input |
variants: [] | Required by the API shape for this flow type; audience splits live under traffic.splits, not this array — leave it empty for this pattern |
status: DRAFT | Unpublished until reviewed |
clientKey | Tenant client key on the body (not OAuth client_id) |
siteId | XM Cloud site id from input |
Update payload (PUT)
When GET succeeds, PUT …/flowDefinitions/{ref} using the flow’s ref from the GET response. Send the full flow document you intend to persist (read-modify-write): merge splits in memory, then PUT.
PUT {FLOW_API_BASE}/flowDefinitions/{ref}
Authorization: Bearer <ACCESS_TOKEN>
Content-Type: application/json
{
  "name": "macbook-pro en - 52c6e3b30da84071bf349317b47875e6",
  "friendlyId": "embedded_52c6e3b30da84071bf349317b47875e6_en",
  "clientKey": "<CLIENT_KEY>",
  "type": "INTERACTIVE_API_FLOW",
  "subtype": "EXPERIENCE",
  "channels": ["WEB"],
  "businessProcess": "interactive_v1",
  "siteId": "{D9EAC5B1-98CF-4C6E-8A8F-111C431B1E33}",
  "ref": "<REF_FROM_GET>",
  "revision": 3,
  "traffic": {
    "type": "audienceTraffic",
    "weightingAlgorithm": "USER_DEFINED",
    "splits": [
      {
        "template": "{\"variantId\":\"a1b2c3d4-e5f6-7890-abcd-ef1234567890\"}",
        "variantName": "fromGoogleMacbook",
        "conditionGroups": [ /* updated or unchanged conditions */ ]
      }
    ]
  },
  "variants": [],
  "status": "DRAFT",
  "schedule": {
    "type": "simpleSchedule",
    "startDate": "2026-09-30T00:00:00.000Z"
  }
}
Merge rules (in your code, before PUT): same variantName + same conditionGroups → leave split as-is; same name + changed conditions → overwrite that split (keep its variantId); new variantName → append a split with a new variantId. Do not blind-replace the entire splits array with only the new variant if other splits already exist unless that is intentional.
Update behavior: see also What happens if you run it again?.
What you should see next: In Personalize, a DRAFT interactive experience for this page/language with split fromGoogleMacbook, UTM source = google, and template containing your variantId.
Step 5 — Apply personalization to the rendering (XML transform)
Goal: Under each matching <r uid="...">, add a ruleset rule whose condition matches the Personalize variantId and whose action is Set Data Source or Hide Rendering.
Do not rebuild the page layout — locate instances and inject rules.
Sitecore Item IDs used in rules
These are OOTB Sitecore personalization definition item IDs (condition/action items under system rules settings). Confirm them against your Sitecore version (for example under /sitecore/system/Settings/Rules) if behavior differs.
| Purpose | Item ID |
|---|---|
| Condition: match Personalize variant | {8E7426A4-12ED-4C44-8625-E7191860E726} with s:VariantName |
| Action: Set Data Source | {0F3C6BEC-E56B-4875-93D7-2846A75881D2} |
| Action: Hide Rendering | {25F351A1-712D-45F8-857D-8AD95BB2ACE9} |
| Default rule condition | {4888ABBB-F17D-4485-B14B-842413F88732} |
Rule structure
Same variantId as in the Personalize split template (the GUID your automation owns):
<rule uid="{<NEW_RULE_UID>}" s:name="a1b2c3d4-e5f6-7890-abcd-ef1234567890">
  <conditions>
    <condition
      uid="<CONDITION_UID>"
      s:id="{8E7426A4-12ED-4C44-8625-E7191860E726}"
      s:VariantName="a1b2c3d4-e5f6-7890-abcd-ef1234567890" />
  </conditions>
  <actions>
    <action
      uid="{<ACTION_UID>}"
      s:id="{0F3C6BEC-E56B-4875-93D7-2846A75881D2}"
      s:DataSource="local:/Data/MacBook Pro from Google" />
  </actions>
</rule>
For Promo Hide Rendering, use action id {25F351A1-712D-45F8-857D-8AD95BB2ACE9} and omit s:DataSource.
Transform behavior:
- Match
<r uid="...">tocomponents[].UID - Create
<rls>/<ruleset s:pet="true">if missing (s:pet="true"is standard Sitecore personalization layout markup, not a custom attribute) - Skip if a rule with the same
s:name(variantId) already exists - Ensure a
Defaultrule remains
Audience conditionGroups are not copied into Sitecore conditions — Personalize already filtered the audience.
Example layout after transform (Hero + Promo)
Illustrative — rule/condition/action uid values are new GUIDs your transform generates; variantId matches Step 4:
<r xmlns:p="p" xmlns:s="s" p:p="1">
  <d id="{FE5D7FDF-89C0-4D99-9AA3-B5FBD009C9F3}">
    <r uid="{B1F293A7-7FC8-4D4E-BD2D-5537A5C443E0}"
       p:before="*"
       s:ds="local:/Data/MacBook_Pro_Hero"
       s:id="{6D0AAE4A-C2D1-4F3A-8285-705D13DE8244}"
       s:par=""
       s:ph="headless-main">
      <rls>
        <ruleset s:pet="true">
          <rule uid="{11111111-1111-1111-1111-111111111111}"
                 s:name="a1b2c3d4-e5f6-7890-abcd-ef1234567890">
            <conditions>
              <condition uid="{22222222-2222-2222-2222-222222222222}"
                         s:id="{8E7426A4-12ED-4C44-8625-E7191860E726}"
                         s:VariantName="a1b2c3d4-e5f6-7890-abcd-ef1234567890" />
            </conditions>
            <actions>
              <action uid="{33333333-3333-3333-3333-333333333333}"
                      s:id="{0F3C6BEC-E56B-4875-93D7-2846A75881D2}"
                      s:DataSource="local:/Data/MacBook Pro from Google" />
            </actions>
          </rule>
          <rule uid="{44444444-4444-4444-4444-444444444444}"
                 s:name="Default">
            <conditions>
              <condition uid="{55555555-5555-5555-5555-555555555555}"
                         s:id="{4888ABBB-F17D-4485-B14B-842413F88732}" />
            </conditions>
            <actions />
          </rule>
        </ruleset>
      </rls>
    </r>
    <r uid="{BED9EF34-72C4-438F-B515-13919BFA8418}"
       p:after="*[1=2]"
       s:ds="local:/Data/mackbook-pro-promo1"
       s:id="{945776A1-8F30-4749-A668-4FCC434A60ED}"
       s:par="..."
       s:ph="headless-main">
      <rls>
        <ruleset s:pet="true">
          <rule uid="{66666666-6666-6666-6666-666666666666}"
                 s:name="a1b2c3d4-e5f6-7890-abcd-ef1234567890">
            <conditions>
              <condition uid="{77777777-7777-7777-7777-777777777777}"
                         s:id="{8E7426A4-12ED-4C44-8625-E7191860E726}"
                         s:VariantName="a1b2c3d4-e5f6-7890-abcd-ef1234567890" />
            </conditions>
            <actions>
              <action uid="{88888888-8888-8888-8888-888888888888}"
                      s:id="{25F351A1-712D-45F8-857D-8AD95BB2ACE9}" />
            </actions>
          </rule>
          <rule uid="{99999999-9999-9999-9999-999999999999}"
                 s:name="Default">
            <conditions>
              <condition uid="{AAAAAAAA-AAAA-AAAA-AAAA-AAAAAAAAAAAA}"
                         s:id="{4888ABBB-F17D-4485-B14B-842413F88732}" />
            </conditions>
            <actions />
          </rule>
        </ruleset>
      </rls>
    </r>
  </d>
</r>
What you should see next: Hero ruleset with Set Data Source + Default; Promo ruleset with Hide Rendering + Default; both personalized rules share the same variantId as the Personalize split.
Step 6 — Update Sitecore configuration
Goal: Persist the transformed XML on __Final Renderings via Authoring GraphQL.
Read:
query GetFinalRenderings {
  item(
    where: {
      database: "master",
      itemId: "{52C6E3B3-0DA8-4071-BF34-9317B47875E6}"
    }
  ) {
    itemId
    name
    field(name: "__Final Renderings") {
      value
    }
  }
}
Write:
mutation {
  updateItem(input: {
    fields: [{
      name: "__Final Renderings",
      value: "<transformed-xml>",
      reset: false
    }],
    database: "master",
    itemId: "{52C6E3B3-0DA8-4071-BF34-9317B47875E6}",
    language: "en",
    path: "/sitecore/content/.../macbook-pro",
    version: 1
  }) {
    item {
      name
      itemId
    }
  }
}
Create the Personalize flow before transforming layout so variantId values stay consistent. If __Final Renderings is empty, skip — there is no layout instance to personalize.
What you should see next: Page item’s __Final Renderings contains the transformed XML; Pages / Content Editor shows personalization rules on Hero and Promo for the Google variant (still subject to your publish pipeline).
Step 7 — Validation
| Check | What “good” looks like |
|---|---|
| Datasources | MacBook Pro from Google exists under {page}/Data with expected fields |
| Template binding | Datasource template matches the Hero rendering’s Datasource Template |
| Flow | Flow exists for friendlyId; status as expected (often DRAFT) |
| Splits | Split fromGoogleMacbook has matching conditionGroups |
| Variant bridge | Split template embeds a variantId also present in Hero/Promo rules |
| Rendering target | Rules sit under the correct Hero and Promo <r uid="..."> |
| Actions | Hero Set Data Source path and Promo Hide match the payload |
| Duplicates | Re-running with identical conditions does not multiply splits/rules |
| XML integrity | Ruleset still contains a Default rule; XML remains parseable |
After the steps: re-runs, AI, and guardrails
What happens if you run it again?
Lightweight idempotency in this pattern:
- Same
variantName+ sameconditionGroups→ skip (no duplicate Personalize split) - Same
variantName+ changedconditionGroups→ update / overwrite the existing split - New
variantName→ append a new split - Existing XML rule with the same
variantId(s:name) → do not duplicate the rule
This is not full governance (no approval workflow, no automatic publish, limited concurrent-edit protection).
Where AI fits
AI is an optional front door to the same pipeline: page context → proposed personalization strategy → human confirm → map to the PersonalizationInput schema → deterministic automation (datasources → Personalize flow → __Final Renderings).
- AI-assisted: opportunities, audiences, draft
datasourceFields, OOTB vs custom actions - Deterministic: GraphQL mutations, Flow Definition create/update, XML transform, duplicate checks
Only OOTB actions should be auto-applied. Default to recommend → confirm → automate — do not claim autonomous publish unless your implementation actually does it.
Governance notes
Recommended improvements
- Formal approval before writing layout or publishing flows
- Soft-fail vs overwrite policy for divergent conditions
- Explicit publish pipeline for XM Cloud + Personalize
- Stronger concurrent-edit protection on
__Final Renderings - Durable audit trail beyond ephemeral logs
Environment caveats: Flow API host/version must match the tenant; confirm OOTB rule/action IDs for your Sitecore version; Marketplace SDK authoring calls differ from raw HTTP but use the same GraphQL concepts.
Conclusion
Treat component-level personalization as a three-system authoring contract: your custom input schema, Personalize for audience splits and an automation-owned variantId, XM Cloud for datasources and __Final Renderings rules.
- Target rendering instances by
uid, and bridge systems with onevariantIdyou generate (or reuse) - Create variant datasources before wiring Set Data Source; keep audience logic in Personalize
- Keep AI in the proposal layer and APIs in the apply layer
That separation keeps automation explainable, testable, and safer to run repeatedly.
References
Official Sitecore documentation
- Flow definition REST API
- Create a flow definition
- Retrieve a flow definition
- Request an access token
- Create an API key (Personalize)
- Personalize base URL
- Authoring and Management GraphQL API
- Query examples for authoring operations
- Enabling and authorizing Authoring API requests
- Marketplace extension points